What is Arithmetic Average Roughness Height?
Arithmetic Average Roughness Height refers to the surface smoothness. The surfaces are not smooth. Every material possesses its surface roughness. Sometimes surfaces are finished deliberately to have high or low surface roughness.
Arithmetic Average Roughness Height is discussed in I4I Academy API Source Inspector - Fixed Equipment Course.
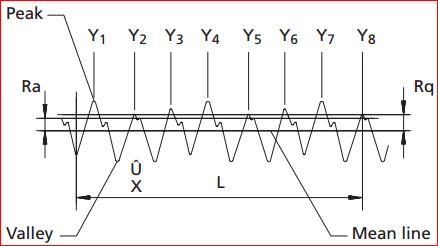
The most commonly used parameter for measurement and interpretation of surface roughness is Arithmetic Average Roughness Height (AARH). AARH is the average height of irregularities, on the surface under observation, from the mean line as shown in the following figure.

The symbol Y1 to Y8 represents the peak heights which are measured from the mean line. Arithmetic Average Roughness Height is usually measured in micro-inches and denoted by symbol “Ra”. There are various standards for the roughness of surfaces, set according to their mode of application.
The equipment used for measurement of surface roughness is profilometer. There are two types of profilometers in use, contact type, and non-contact type.
In contact type profilometer the roughness is measured by moving the material under profilometer stylus. However, newer equipment implies various other non-contact profilometry options such as optical and ultrasonic techniques.
Arithmetic Average Roughness Height in Flange
American Society of Mechanical Engineers (ASME) and American National Institute (ANSI) defined specific roughness standards for the flanges. The surface finishes produce desired roughness at the face of a flange which ensures that it is compatible with the gasket and provides high-quality sealing.
ASME B16.5 standard is specific to flanges and flanged fittings. The standard contains requirements and recommendations related to flange bolting, flange gasket, and flange joints.
AMSE Standards for Surface Roughness in Flange
The surface finish as the flange face plays a key role in gasket’s reliability and service life. According to ASME standards the serrated, serrated spiral and concentric flange face finish should have an average roughness of 125 µinch to 250 µinch (3.2 µm to 6.3 µm).
The cutting tool used for imprinting the required roughness should have a radius of 0.06 inch (1.5mm) or larger. The groove density on the flange face should be from 45 grooves/ inch to 55 grooves/ inch (1.8 grooves/ mm. to 2.2 grooves/ mm.).
These are the standards for semi-metallic and nonmetallic gaskets. If average roughness of flange face is not according to the described standards, there will be no essential friction between the contacted surfaces.
It makes the gaskets susceptible to creep and tear after some time working under pressure. This will result in loss of bolt joint tightness and a possible leakage. The soft nonmetallic materials such as Poly-Tetra-Flouro-Ethylene (PTFE) plastics can be used for more comfortable facing and better creep resistance.
Permissible Imperfection Level in Roughness Standards
The sealing performance of gasket fitted between flanges depends on surface roughness (Arithmetic Average Roughness Height), the size of flange and pressure of bolting. According to ASME standards, the adjacent imperfections should be separated by a distance of at least 4 times the maximum radial projection.
The radial projection can be evaluated by subtracting inner radius from the outer radius. The serrations should be on the same level, and the protrusion above them is not permitted. It can cause the adjacent serrations to loose hold of the gasket material and may result in creep and potential leakage.
Classification of Flange Surface Roughness Based on their Finishes
The standard finishes for required level of average roughness height on the flange face are described below.
- Stock Finish
This finish is used for general purpose flanging and is suitable for most of the ordinary service conditions. The pressure embeds the soft face of the gasket into the finish and results in the formation of a seal.
The pressed contacted surface generates the high level of friction. The resultant “Ra” value for the surface ranges from 125µinch to 500 µinch (125 µm to 12.5 µm.
- Spiral Serrated finish
The spiral serrated finish resembles with the stock finish and is photographic spiral groove type. However, it is different from the stock finish because the angle of generation of Grove is “V” shaped kept at 45° angle. They also produce roughness of 125 to 250 µinch.
- Smooth Finish
In this type of finish, the surface is smooth, and there are no apparent signs of grooves or tool marking. The smooth surface is generated by treating the stock surface with 0.8 mm (0.031 inch) round-nosed tool to make spiral groove of average depth 0.05mm (0.00197 inch).
The AARH value for these gaskets ranges between Ra 125 µinch to 250 µinch (3.2 µm to 6.3 µm).
- Coldwater Finish
The cold water finishes appear shiny to the naked eye and are very smooth. The AARH value for these flange surfaces is 85 µinch to 100 µinch. They are used with metal to metal contact. No gasket is used between the flanges.
The average arithmetic roughness height values are very important during the selection of flanges and gasket materials. Higher the “Ra” values depicts a more rough surface, while lower values represent smoother surface.
Free newsletter!
Sign up to receive my monthly newsletter covering all the latest courses and updates.


New! Comments
Have your say about what you just read! Leave me a comment in the box below.