Watch our Most Recent Videos | Visit us on LinkedIn | Visit us on YouTube
ASME Pressure Vessel Joint Efficiencies
The ASME Pressure Vessel Joint Efficiencies article provides you with information about pressure vessel joint efficiency requirements and their connection with radiography testing.
You may know Pressure Vessel Joint Efficiencies are linked to the radiography testing grades and there is a concession for full radiography testing as per the UW-11(a) (5) (b) clause which it is a little bit confusing.
This article provides you the ASME pressure vessel joint efficiencies requirements and guidelines for the above clause.
Based on the ASME Code requirement, manufacturers have to mark the type of RT i.e. RT1, RT2, RT3 and RT4 in the pressure vessel name plate and state the same in Pressure Vessel Data Report.
The ASME Training Course is 5 days training course and available online and the student that successfully pass the exam, receive I4I academy certificate with 40 hours training credit.
The I4I Academy API 510 Pressure Vessel Inspector Exam Prep course thoroughly addresses ASME Pressure Vessel Joint Efficiencies. This topic is also a focal point in our ASME training course, specifically covered under ASME Section VIII Div.1. Given that ASME Section VIII Div.1 is a crucial component of the API 510 exam, students must familiarize themselves with Vessel Joint Efficiencies to succeed in the examination. Additionally, this subject is included in the I4I Academy Source Inspection course.

We have seen many professionals, from inspectors to quality control engineers who are confused between RT1 and RT2, specifically when they see ASME Pressure Vessel Joint Efficiencies for both RT1 and RT2 is the same and equal to 1(E=1).
They say both RT1 and RT2 are categorized in the “Full Radiography” part in UW-11 clause ...
So why are some joints in RT2 radiographed in spots?
We are making spot radiography, but it is categorized in full radiography!!!
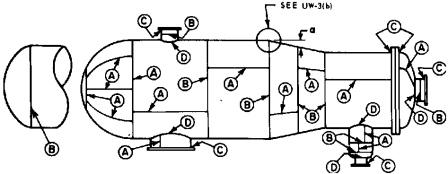
So in this "ASME Pressure Vessel Joint Efficiencies" article we want to answer this question in very simple way, but before this, we need review joint categories and summarize them as below:
ASME Pressure Vessel Joint Efficiencies - Category A Joints
- All longitudinal welds in shell and nozzles
- All welds in heads, Hemisph-head to shell weld joint
ASME Pressure Vessel Joint Efficiencies
ASME Pressure Vessel Joint Efficiencies - Category B Joints
- All circumferential welds in shell and nozzles
- Head to shell joint (other than Hemisph.)
ASME Pressure Vessel Joint Efficiencies - Category C and D Joints
Category C and D are flange welds and nozzle attachment welds respectively
Longitudinal welds (Category A) are more critical than Circumferential welds (Category B) because they are under double stress.
This the reason why in different part of ASME code we have stringent rules in category A joint compared to category B joint.
See the following Fig. for joint categories:

Now let's get back to the ASME Pressure Vessel Joint Efficiencies subject, to remove the above confusion about RT1 and RT2.
We need to know:
When and where is there a code requirement for full radiography?
Item 1: All butt welds in vessels used to contain a lethal substance (UW-11(a)).Lethal substances have specific definitions in ASME Code in UW-2 and it is the responsibility of the end user to determine if they ordered a vessel that contains lethal substances.
Item 2: All butt welds in vessels in which the nominal thickness exceeds specified values (UW-11(a). You can find these values in subsection C, in UCS-57, UNF-57, etc. For example, this value for P-No.1 in UCS-57 is 1 ¼ inch.
Item 3: All butt welds in an unfired steam boiler with design pressure > 50 psi (UW-11(a)).
Item 4: All category A and D butt welds in vessel when “Full Radiography” optionally selected from table UW-12(column (a) in this table is selected); and categories B and C which intersect Category A shall meet the spot radiography requirement (UW-11(a) (5) (b)).
The point is this: items 1, 2 and 3 are similar, but item 4 is completely different. In items 1, 2 and 3 it is mandated by code; to do full radiography in all butt welds in vessel so it means it is mandatory for designer to select column (a) in UW-12 table.
But in item 4, there is no mandating rule. A manufacturer with its own decision has chosen to use column (a) in table UW-12 for full radiography.
So here there is a concession or bonus to manufacturers for categories B and C.
What is concept behind this concession or bonus in pressure vessel RT test?
If you review item 1, 2 and 3 one more time, you will see that the pressure vessel RT tests are related to the type of welds and services.
You can see the pressure vessels in these items are critical from a safety point of view, one contains a lethal substance, the other one has a high thickness, which implicates high pressure, and the last one is an unfired steam boiler. But item 4 has no criticality like the other items have.
But you should note all 4 items have been categorized in full radiography clause( U-11(a)), so to differentiate item 1, 2 and 3 from item 4, the RT symbols are used in Code (UG-116).
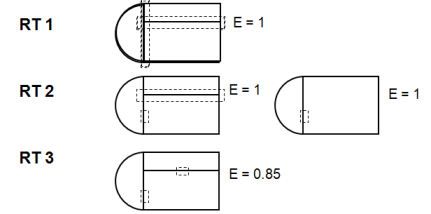
RT 1: Items 1, 2 and 3, (E=1), All butt welds-full length radiography
RT 2: Item 4 (E=1), Category A and D butt welds full length radiography and category B and C butt welds spot Radiography
RT 3: (E=0.85), Spot radiography butt welds
RT 4: (E=0.7), Partial / No radiography
You need to consider the hemispherical head joint to shell as category A, but ellipsoidal and torispherical head joint to shell as category B;
Do you know why? Why ASME considered the stringent rule for pressure vessel RT test in hemispherical head joint?
It is because this joint is more critical, because the thickness obtained from the formula for hemispherical head approximately would be half of the shell thickness;
It means if the shell thickness is 1 inch, the hemispherical head thickness would be 0.5 inch.
For more detail, you may review the Pressure Vessel Heads article.
ASME Pressure Vessel Joint Efficiencies for welded Heads
For Welded Heads, the joint efficiency of the vessel will be 1(E=1), if all welds within the head's full length are radiographed (since they are all Cat. A welds). See above figure.
ASME Pressure Vessel Joint Efficiencies for Seamless Heads
For seamless heads, the joint efficiency of the vessel will be 1(E=1) if the head to shell weld is fully radiographed for the hemispherical Head (Cat A);
See the following Figure for RT types:

Spot radiographed for ellipsoidal and torispherical heads(Cat. B).
Weld Types
Here is some clarification about the different type of welds that have specific definitions in ASME Code SEC VIII DIV 1 and related to the pressure vessel RT test.
The concept is to define the different types and then introduce some restriction for using them.
For example, a Type 1 weld is defined as a full penetration weld, typically double welded and Type 2 is welds with backing strips.
So when you go to service restriction for a vessel containing a lethal substance, you see there is a restriction there that says all category A joints shall be weld Type 1 and Category B and C shall be type 1 or type 2.
You should take this point in to account, which is this: the same joint category with different weld types have different joint efficiencies.
Summary of weld types:
Type 1: Full penetration welds (Typically Double welded)
Type 2: Welds with backing strip
Type 3: Single welded partial penetration welds
Type 4, 5 and 6: Various Lap welds (rarely used)
Related Articles
Pressure Vessel Definition, Pressure Vessel Certification, Pressure Vessel Heads, Pressure Vessel Handbook, Spherical Pressure Vessel, Pressure Vessel Plate Material, ASME Impact Test Requirement, Pressure Vessel RT Test , Vessel Pressure Testing ,Third Party Inspection for Pressure Vessel, Inspection and Test Plan for Pressure Vessel, ASME Code Section 8
Free newsletter!
Sign up to receive my monthly newsletter covering all the latest courses and updates.


