Radiographic Testing Procedure
This content provides you with a example Radiographic Testing Procedure. This is a general and sample RT procedure and you need to modify it to meet your project specifications.
1. SCOPE - RADIOGRAPHIC TESTING
1.1-This Procedure describes the general requirements for radiography examination (RT) according to related approved weld map for the metallic welding and casting as may be required by the specification or under which component is being designed and manufactured.
1.2-This radiographic testing procedure provides the material, equipment, calibration, personnel qualification, examination process, evaluation, records and acceptance standards for XXX Project which will be fabricated in YYY.
2. SURFACE CONDITION - RADIOGRAPHIC TESTING
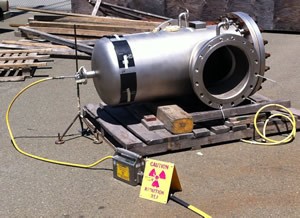
According to T.222.2, the weld ripples or weld surface irregularities on the both the inside (where accessible) and out side shall be removed by any suitable process to such a degree that the resulting radiographic testing image due to any surface irregularities cannot mask or be confused with the image of any discontinuity. the finished surface of all butt welded joints mat be flush with the base material or may have reasonably uniform crowns, with reinforcement not to exceed that specified in the referencing code section.
Radiographic Testing is a key topic integrated into various I4I Academy training programs, such as the API 510 Pressure Vessel Inspector course, API 570 Piping Inspector Training Course, and API 653 Aboveground Storage Tank Inspector course. Additionally, it is a component of the I4I Academy ASME training course and API Source Inspector course. Each of these courses encompasses ASME Section V, focusing on nondestructive testing methodologies.
3. RADIATION SOURCE - RADIOGRAPHIC TESTING
3.1-
X-Radiation:
The radiography testing techniques shall demonstrate that the required radiography sensitivity has been obtained. Maximum x-ray voltage is 300 KV.
3.2- Gamma radiation:
The recommended minimum thickness for which Radio-active isotopes may be used as follow:
Table – 3.2
| Material | Iridium192 | Cobalt 60 |
|---|---|---|
| Steel | 0.75 in | 1.50 in |
| Copper or high nickel copper | 0.65 in | 1.30 in |
| Aluminum | 2.50 in | -- |
The maximum thickness for the use of radioactive isotopes is primarily dictated by exposure time, therefore; upper limits are not shown. The minimum Recommended thickness limitation may be reduced when the radiography techniques are used to demonstrate that the required radiographic testing sensitivity have been obtained, by purchaser approval.
4. RADIGRAPHIC FILMS
Any commercially available industrial radiography films may be used in accordance with SE 1815(ASTM) standard test method for film system in industrial radiography. Radiography film shall be fine grain high definition, high contrast film (Kodak type AA 400, FUJI 100 or AGFA D7).
5. SCREENS
Any commercially available intensifying screen, except those of the fluorescent type, may be used. Intensifying screen for x-ray or Gama ray method divided in two categories: 1-front screen 2-back screen. Commonly lead screens use with 27 micron thickness. (Front screen)
6. PENETRAMETER (I.Q.I)
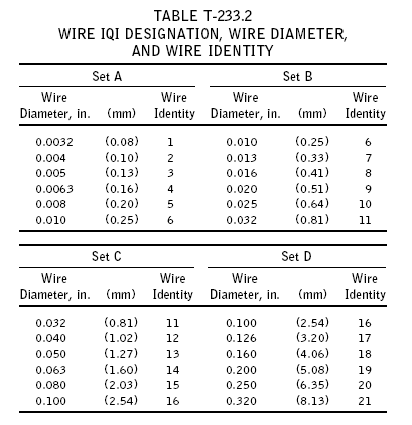
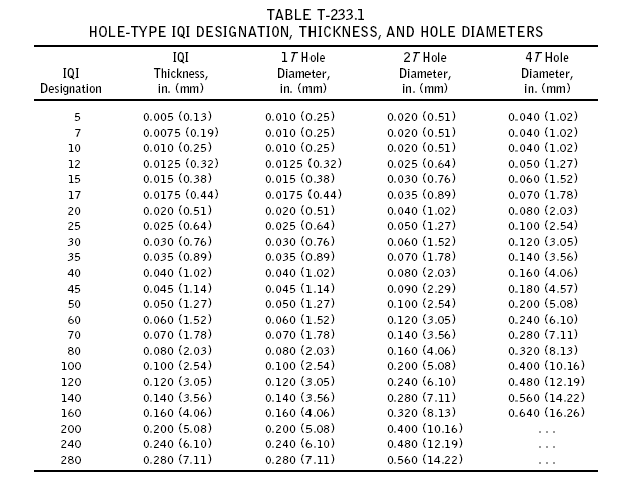
Penetrameters shall be either the whole type or the wire type and shall be manufactured and identified in accordance with the requirements or alternatives allowed in SE 142 or SE 1025 (for whole type) and SE-747 (for wire type), and appending. ASME V 2007 ED & ASME Sec VIII Div I ED 2007.
Penetrameters shall consist of those in table 233.1 for hole type and those in table 233.2 for wire type. (Wire type IQI shall be used for welds.)
7. SELECTION OF PENETRAMETER (I.Q.I)
7.1.
Material. IQIs shall be selected from either the same alloy material
group or grade as identified inSE-1025, or SE-747, as applicable, or from an
alloy material Group or grade with less radiation absorption than the material
being radiographed.
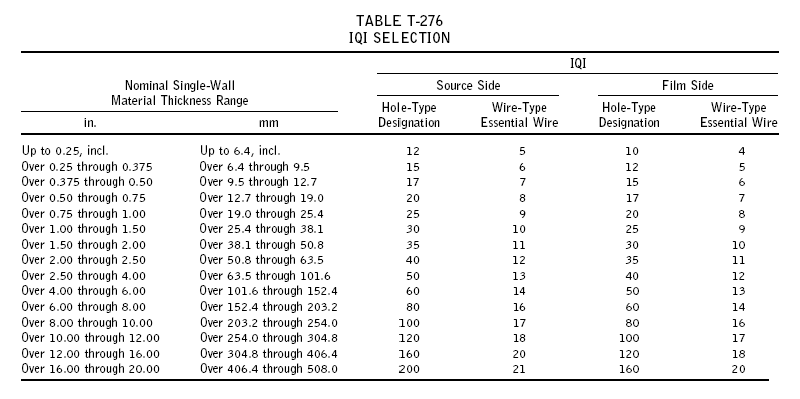
7.2 Size. The designated hole IQI or essential wire listed in Table T-276 provided an equivalent IQI sensitivity is maintained. See T-283.2.shall be as specified in Table T-276. A thinner or thicker hole-type IQI may be substituted for any section thickness
(a) Welds With Reinforcements. The thickness on which the IQI is based is the nominal single-wall thickness plus the estimated weld reinforcement not to exceed the maximum permitted by the referencing Code Section. Backing rings or strips shall not be considered as part of the thickness in IQI selection. The actual measurement of the weld reinforcement is not required.
(b) Welds Without Reinforcements. The thickness on which the IQI is based is the nominal single-wall thickness. Backing rings or strips shall not be considered as part of the weld thickness in IQI selection.
7.3 Welds Joining Dissimilar Materials or Welds with Dissimilar Filler Metal. When the weld metal is of an alloy group or grade that has a radiation attenuation that differs from the base material, the IQI material selection shall be based on the weld metal and be in accordance with T-276.1. When the density limits of T-282.2 cannot be met with one IQI and the exceptional density area is at the interface of the weld metal and the base metal, the material selection for the additional IQIs shall be based on the base material and is in accordance with T-276.1
8. PLACEMENT OF RADIOGRAPHIC TESTING PENETRAMETER (I.Q.I)
8.1- Source side
penetrameters:
The penetrameters shall be placed on the source side of the part being examined, except for the condition described in chapter 8.2.
8.2- film side penetrameters:
Sensitivity:
The sensitivity required using wire type IQI shall be 2%.
Sensitivity:(Diameter of thinnest wire visible on radiograph / Part thickness at IQI location) x 100
Where inaccessibility prevents hand placing the penetrameter (s) on the source side, it shall be placed on the film side in contact with the part being examined. A lead letter “F” shall be placed adjacent to or on the penetrameter (s).
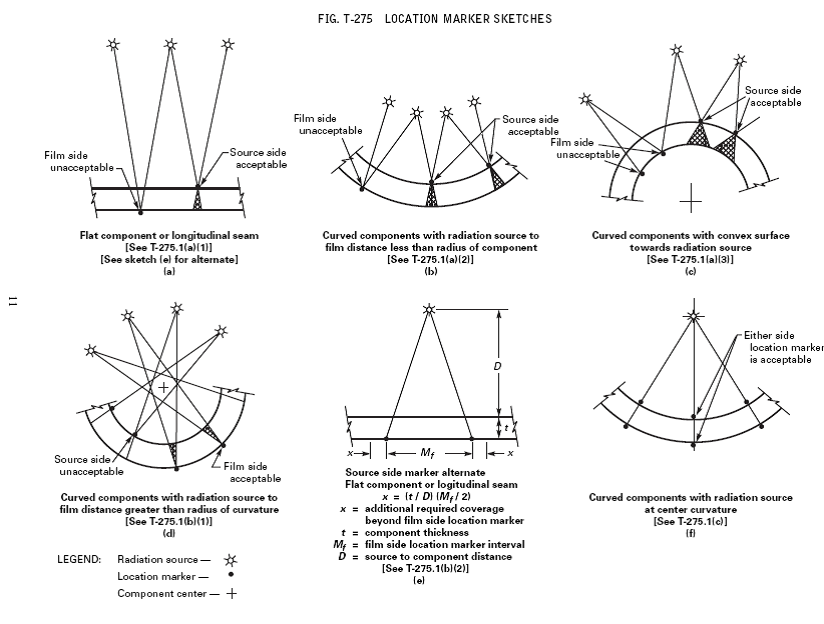
9. NUMBER OF PENETRAMETER (I.Q.I)
When one or more film holders are used for an exposure, ate least one penetrameter imager shall appear on each radiograph.
If the requirements of T-282 are met by using more than one penetrameter, one shall be representative of the lightest area of interest and the other the darkest area of interest.
The intervening densities, on the radiograph, shall be considered as having acceptable density.
Number of I.Q.I shall be according to ASME SEC V.T.277.2.
10. RADIOGRAPHIC TESTING TECHNIQUE
A single-wall exposure
technique shall be used for radiography whenever practical. When it is not
practical to use a single-wall radiographic testing technique, a double-wall technique shall be
used. An adequate number of exposures shall be made to demonstrate that the
required coverage has been obtained.
10.1 Single-Wall Technique. In the single-wall radiographic testing technique, the radiation passes through only one wall of the weld (material), which is viewed for acceptance on the radiograph.
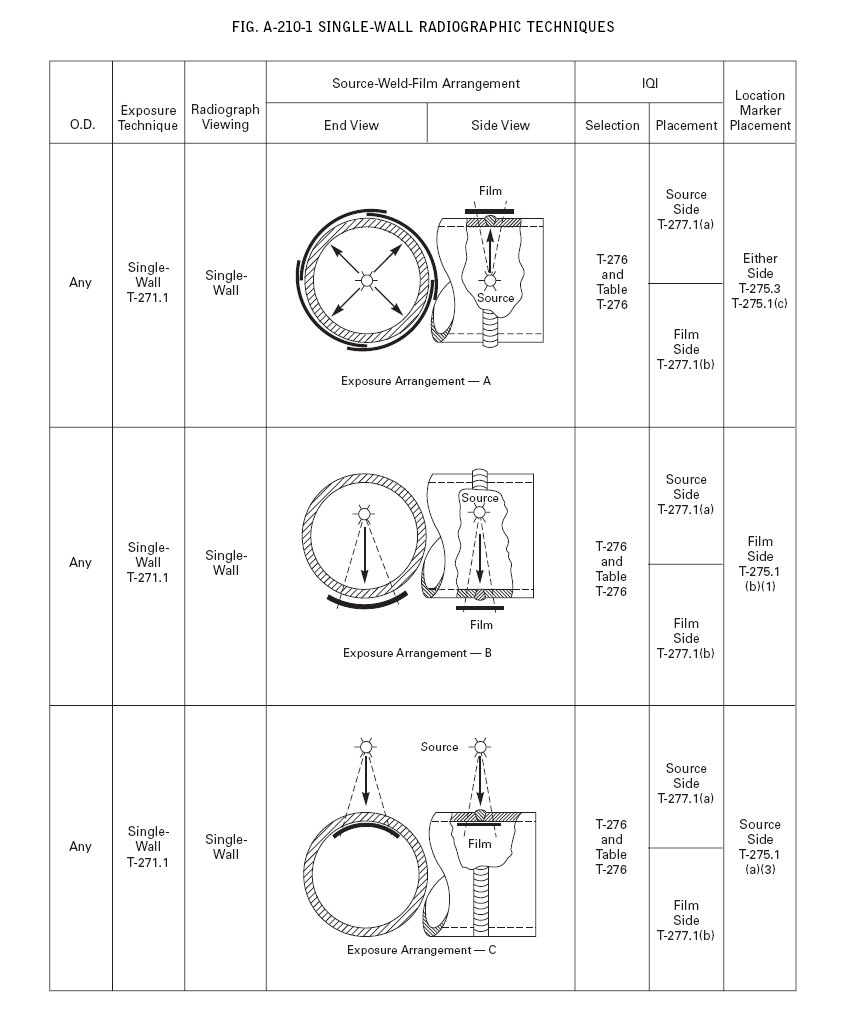
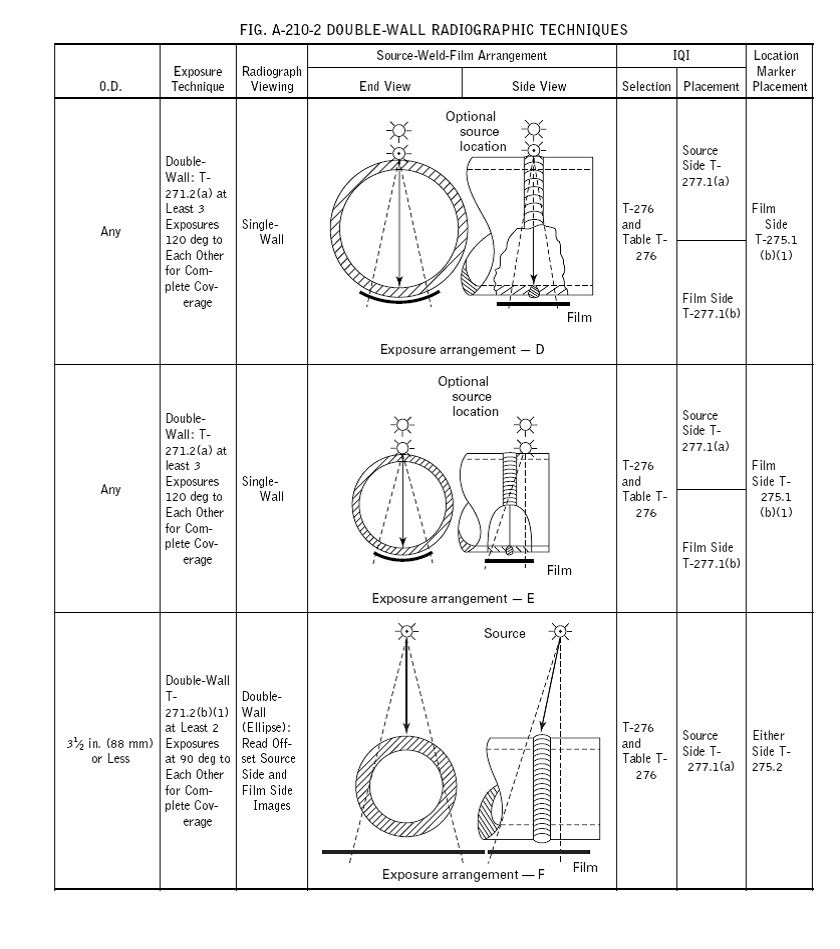
10.2 Double-Wall Technique. When it is not practical to use a single-wall technique, one of the following double-wall techniques shall be used.
(a) Single-Wall Viewing. For materials and for welds in components, a technique may be used in which the radiation passes through two walls and only the weld (material) on the film-side wall is viewed for acceptance on the radiograph. When complete coverage is required for circumferential welds (materials), a minimum of three exposures taken 120 deg to each other shall be made.
(b) Double-Wall Viewing. For materials and for welds in components 31⁄2 in. (89 mm) or less in nominal outside diameter, a technique may be used in which the radiation passes through two walls and the weld (material) in both walls is viewed for acceptance on the same radiograph .For double-wall viewing, only a source-side IQI shall be used. Care should be exercised to ensure that the required geometric unsharpness is not exceeded. If the geometric unsharpness requirement cannot be met, then single-wall viewing shall be used.
(1) For welds, the radiation beam may be offset from the plane of the weld at an angle sufficient to separate the images of the source-side and film-side portions of the weld so that there is no overlap of the areas to be interpreted. When complete coverage is required, a minimum of two exposures taken 90 deg to each other shall be made for each joint.
(2) As an alternative, the weld may be radio graphed with the radiation beam positioned so that the images of both walls are superimposed. When complete coverage is required, a minimum of three exposures taken at either 60 deg or 120 deg to each other shall be made for each joint.
11. SOURCE TO OBJECT AND OBJECT TO FILM DISTANCE (SOD & OFD)
According to geometric unsharpness formula (Ug = f *OFD/FOD) for minimizing the Ug value, OFD value shall be minimizing therefore object to film distance shall be minimum.
Source to object distance (SOD) shall be set according radiographic technique, object shape and strength of source.
12. RADIOGRAPHIC TESTING IDENTIFICATION SYSTEM
The method shall be used to produce permanent identification to the radiographies traceable to the contract, components, welds or weld seams, or part numbers, as appropriate. This identification mark shall not obscure the area of interest.
13. RADIOGRAPHIC TESTING ACCEPTANCE STANDARD
Refer
to ASME Sec VIII, Div. I
a) Butt welded joints surfaces shall be sufficiently free from coarse ripples ,grooves , overlaps and abrupt ridges and valleys to permit proper interpretation of radiographic and the required non-destructive examinations.
If there is a question regarding the surface condition of the weld when interpreting a radiographic film, the film shall be compared to the actual weld surface for determination of acceptability.
b) Indications shown on the radiographies of welds and characterized as imperfections are un-acceptable under the following condition:
1) Any indications characterized as a crack or zone of incomplete fusion or penetration.
2) Any other elongated indication at radiography, which has length greater than:
(a) 1/4 in. (6mm) for t up to 3/4 in. (19mm)
(b) 1/3 t for t from 3/4 in. (19mm) to 2 1/4 in. (57mm)
(c) 3/4 t (19mm) for t over 2 1/4 in. (57mm)
Where: t= thickness of weld excluding any allowable reinforcement.
3) Any group of aligned indications that have an aggregate length greater than t in a length of 12t , except when the distance between the successive imperfections exceed 6L where L is the length of the longest imperfection in the group.
4) Rounded indications in excess of that specified by the acceptance standards given in ASME sec. VIII, DIV I, appendix 4 fig. 4-2 to 4-8
Note: spot RT shall be done as per ASME Sec. VIII, Div. 1 UW-52; however the acceptance criteria shall be according to UW-51 (as specification).
14. DEFECT REMOVAL
Repair area shall be located on the weld line after evaluation & interpretation of radiograph .defects shall be removed by suitable method such as grinding, chipping or gouging (if permitted).welding of the repair area shall meet the requirement of related WPS,PQR.
15. CERTIFICATION AND PERSONNEL QUALIFICATION IN RADIOGRAPHIC TESTING.
Personnel performing radiography examination to this procedure shall be qualified and certified by XXX also shall meet the requirements of ASNT-SNT-TC-1A-2001 EDITION at least level II and on ASNT-SNT-TC-IA for code section I and sec VII div 2. Film interpreter shall have level II as a minimum.
Free newsletter!
Sign up to receive my monthly newsletter covering all the latest courses and updates.


New! Comments
Have your say about what you just read! Leave me a comment in the box below.