Step by Step Dye Penetrant Testing
This article addresses a step by step dye penetrant testing process. There are two techniques for dye penetrant test as follow:
- Color contrast or visible dye penetrant testing
- Fluorescent dye penetrant testing
Step by Step Dye Penetrant Testing is addressed in I4I Academy API 510 pressure vessel inspector course (API RP 577 - Welding Metallurgy); we also cover this subject in the API 570 Piping inspector course and API 653 Storage Tank Inspector through API RP 577. The acceptance criteria also are covered in these courses.
Each of above
techniques can be performed with three different processes as follow:
- Solvent Removable
- Water Washable
- Lipophilic / Hydrophilic emulsification
In this article, we are going to explain the simplest technique and process which is used for portable application in the field. Some of the above-mentioned processes are designed for lab test application and would not be easy to be conducted in the field. Here is the step by step dye penetrant testing process:

Step by Step Dye Penetrant Testing - Visible Technique with Solvent Removable Process
Step 1 - Precleaning of the Surface
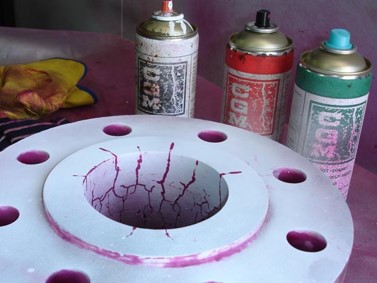
The 3 spray cans (aerosol) are provided for this test. First one is named cleaner. The technician sprays the cleaner to the test object and then cleans the surface with non-used rag or cloth. The sprayed material is evaporated rapidly. So the technsion needs to clean the surface instantly.
Step 2- Application of Penetrant
In the second step, the technician applies penetrant spray can to the surface which is in sharp red color. The technician needs to wait for 5 to 15 minutes depends on test procedure. In this time, the penetrant liquid enters to the crack (normally is not visible). The penetrant liquid soaks inside of the defects/ imperfections by capillary action.
Step 3- Removal of the Excess Penetrant Liquid
In the third step, the technician removes penetrant liquid from the surface by rag or cloth and uses back and forth rubbing to clean the surface. No red color should be visible after cleaning. Then technison takes a clean rag and sprays some cleaner on a cloth and then cleans the surface one more time. This can be done two or three times to remove all penetrant liquid from the surface. Please note by the capillary action; the penetrant liquid still is in the cracks or hot tear or any other imperfection. It will not come out by cleaning as described.
Step 4 - Application of Developer
In the fourth step, the technician takes the developer spray can and agitates it and then sprays to the surface. Then he waits for 10 minutes. In this time, the defect will be visible, the developer material uses reverse capillary action and bleeds out the red penetrant, and if there is a crack in the surface, you will see a red line within the white color covered by developer material.
Step 5 - Evaluation / Interpretation
In the fifth step, The ASNT Level II liquid penetrant inspector evaluates the test result based on the acceptance criteria indicated in the approved test procedure. Please note one indication might be considered imperfection and be rejected by one acceptance criteria and be accepted by another one. So it is imperative that the test be evaluated with right acceptance criteria.
Step 6 - Liquid Penetrant Test Report
In the sixth step, The technician prepares the report and indicates the test results and submits to the customer.
Free newsletter!
Sign up to receive my monthly newsletter covering all the latest courses and updates.


New! Comments
Have your say about what you just read! Leave me a comment in the box below.